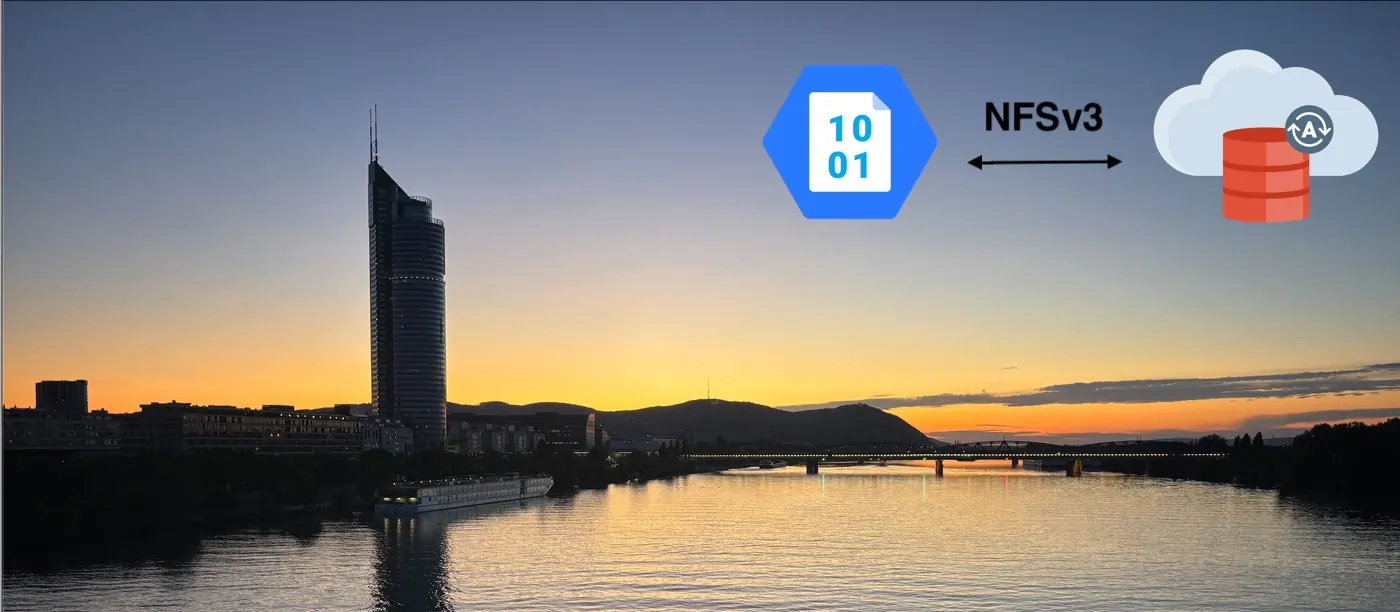
When migrating an on-premises Oracle database to Oracle Autonomous Database (ADB) with Oracle Database@Azure, a common challenge is moving the data. For logical migrations to ADB, several options are available: One option is to use Azure Blob Storage, which can be mounted directly as an NFSv3 file system on your Autonomous Database. In this tutorial we will go over the steps to mount an Azure Blob Container to an Autonomous Database.
Prerequisites
This tutorial assumes that you have a Virtual Network (VNet) with the following resources deployed:
- Primary subnet with Oracle Delegation: This subnet must be delegated to the
Oracle.Database/networkAttachments service. This is the subnet where your Autonomous Database is deployed. - Autonomous Database: You should have deployed an Autonomous Database with a private endpoint and be able to connect to it.
- (Optional, but recommended) Secondary subnet for PE and Azure VM: A separate subnet should be used for your private endpoints. The endpoints could also be deployed to a peered VNet. Deploy an Azure VM into the secondary subnet.
Important: Verify if you have activated Advanced Networking, before adding the subnet delegation. Without Advanced Networking the connection between your database to a private endpoint in the same virtual network on Azure-delegated subnets will not function properly. You can use VNet peering to work around this limitation.
Creating the Azure Storage Account
To begin, you need to create an Azure Storage Account that supports the NFSv3 protocol. You can also refer to the official Microsoft documentation to learn about the supported configurations. Below you can find a summary of parameters to set, you can leave everything else to the default settings:
- Storage Account Creation
- Region: Select the region, where your VNet resides.
- Primary service: Select Azure Blob Storage or Azure Data Lake Storage Gen 2
- Redundancy: Locally-redundant storage (LRS) or Zone-redundant storage (ZRS)
- Advanced Settings
- Hierarchical Namespace: Enable the Hierarchical namespace option during creation.
- NFSv3 Protocol: Under the advanced settings, make sure to enable Network file system (NFS) v3.
- Network Access
- Public Network Access: You can disable public access, but it’s optional. If you enable public access, you must also access scope to selected VNets and IP addresses.
- Private Endpoint: To ensure secure and private communication, configure a private endpoint for your storage account. This endpoint should be placed in the separate subnet you designated for private endpoints in the prerequisites. This step ensures that traffic between your Autonomous Database and the storage account never leaves the Azure private network. You can select “Integrate with private DNS zone” or use a custom DNS solution.
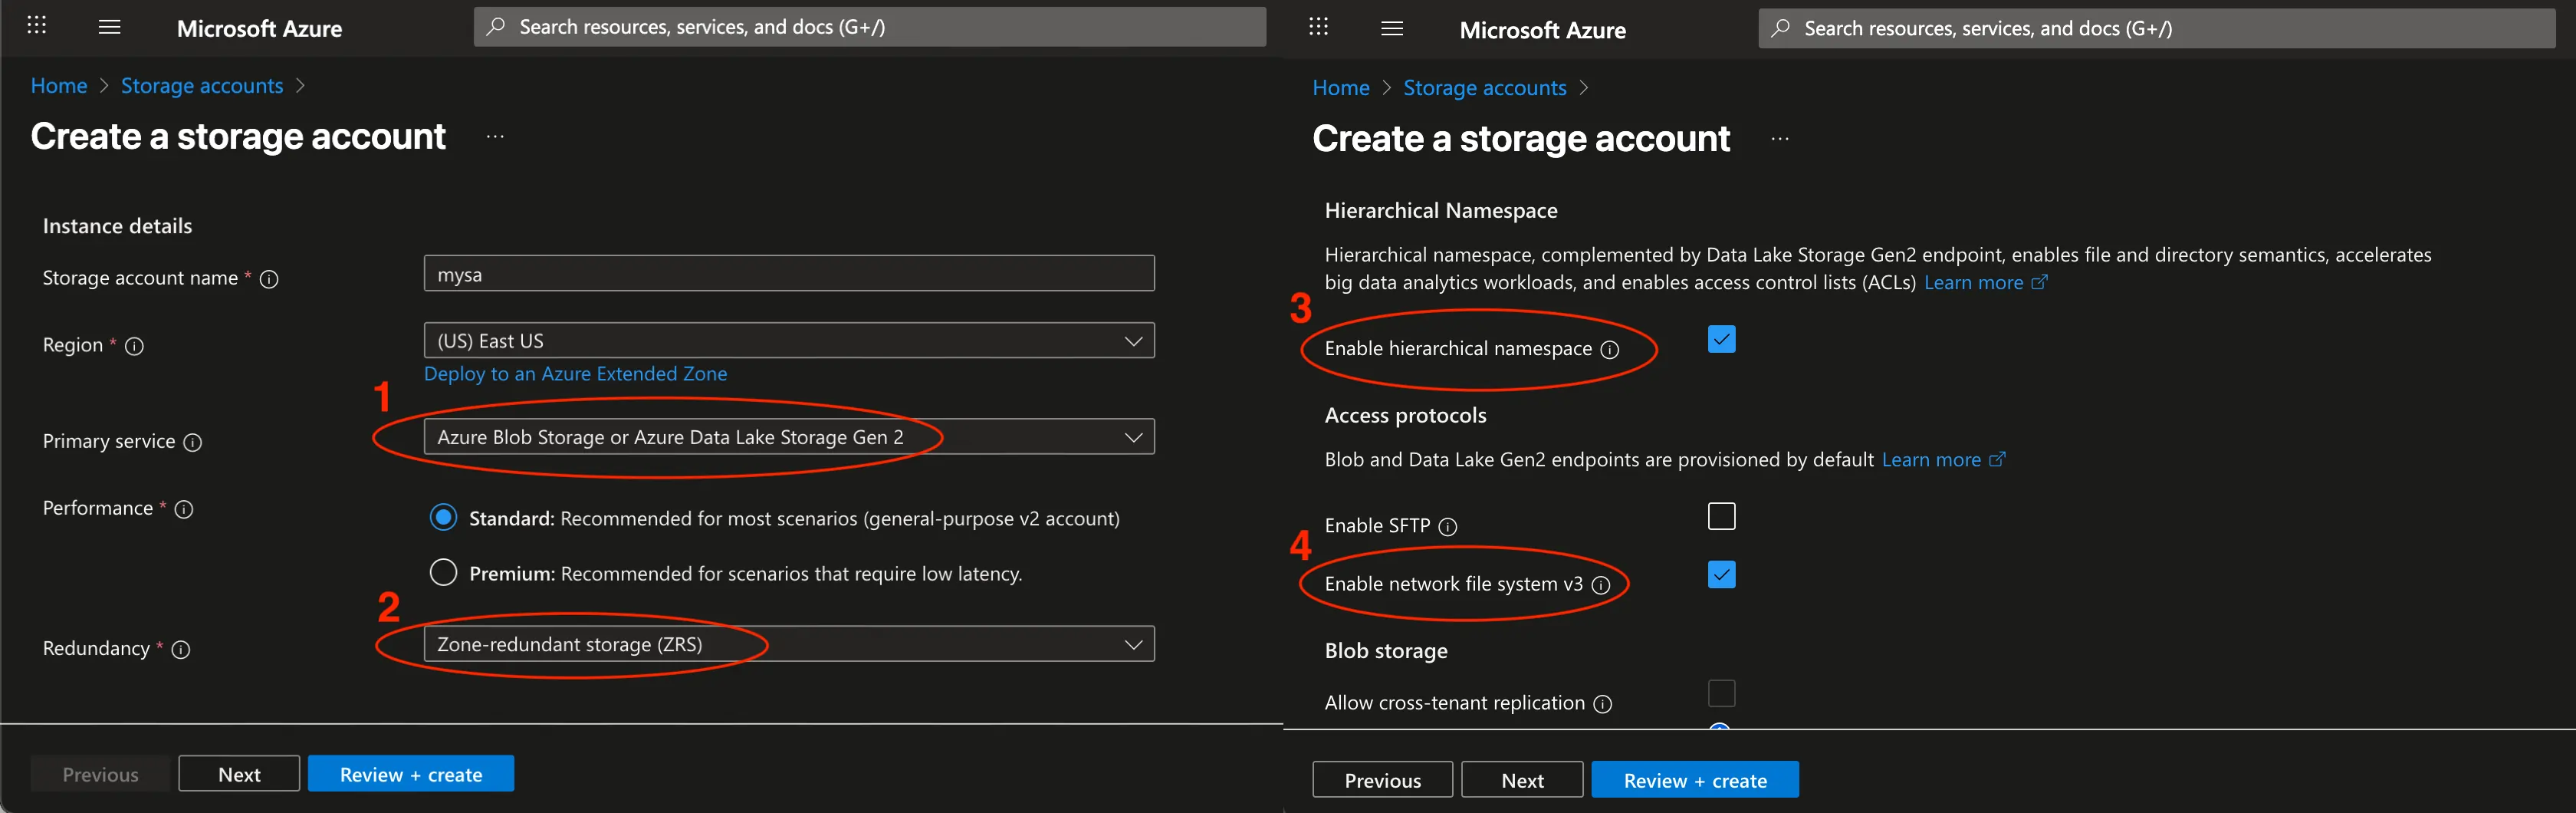
Change the configuration on the storage account like this:
- Create a container: Once the Storage Account has finished provisioning, open the Storage Account, head to Data Storage -> Containers and create a new container. You can leave the option “No Root Squash”.
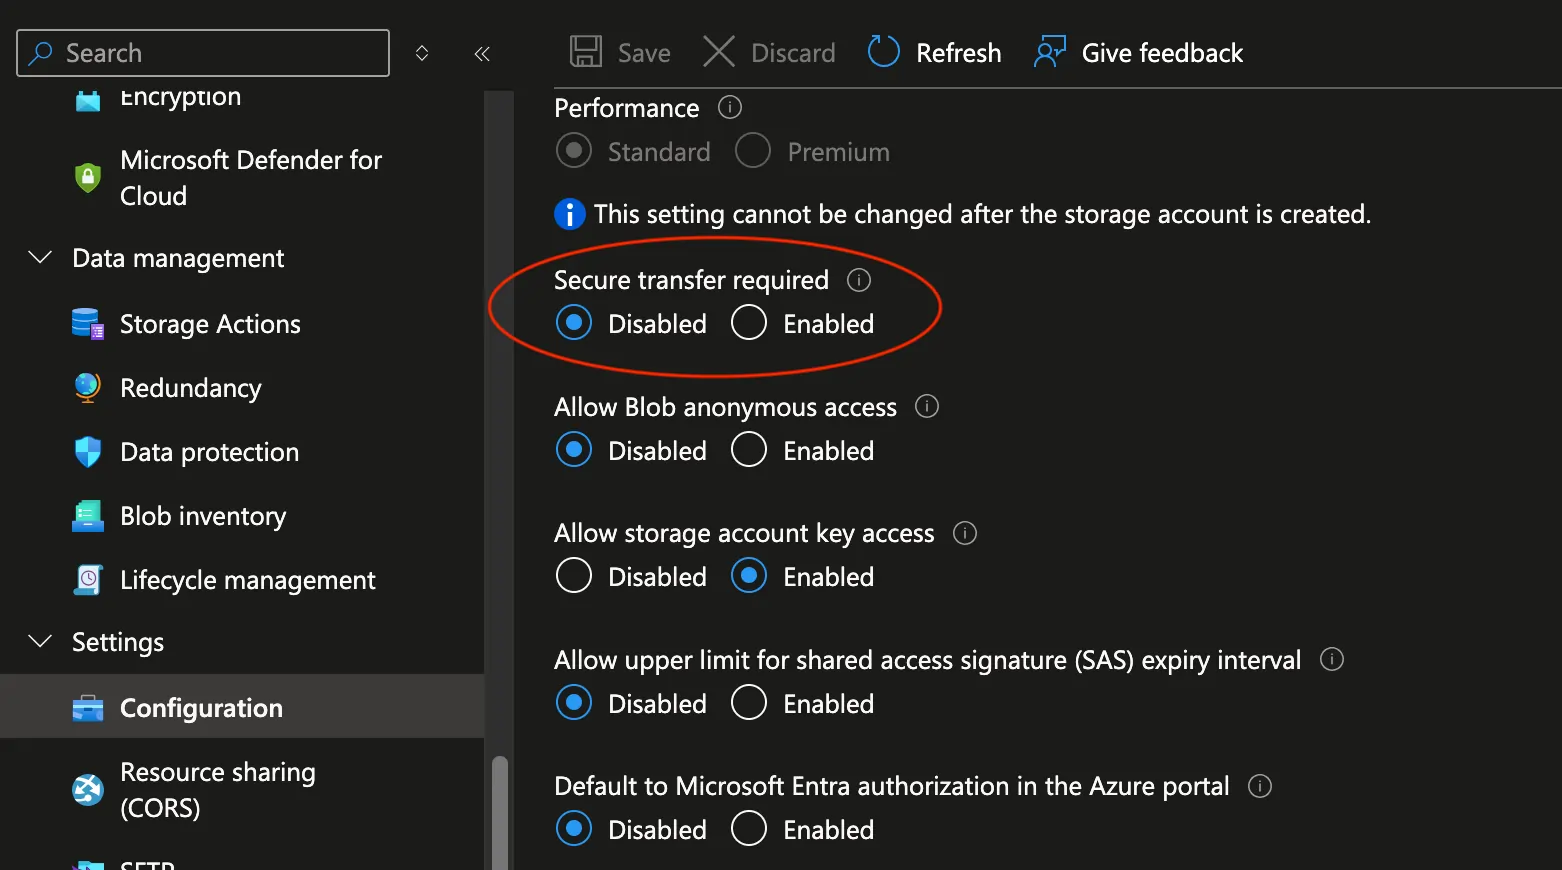
- Secure Transfer: The
DBMS_CLOUD_ADMIN package in Oracle Autonomous Database does not directly support the use of stunnel or TLS wrappers likeaznfsuses for encrypting NFSv3 connections. Since the traffic is already secured by staying within your private Azure network via the private endpoint, disabling this option is necessary for the connection to work. On your storage account, go to Settings -> Configuration, and disable Secure transfer required.
That’s it for the Storage Account configuration. You can optionally test the connection by mounting the Storage Account on a Linux VM. On my Linux VM I confirmed that I can resolve the URL using:
nslookup maxfielduseastnfssa.blob.core.windows.net
In my case it resolved to 10.0.0.7. After creating a new directory using mkdir -p /mnt/blobnfs, I was able to successfully mount the storage account using this command:
sudo mount -t nfs maxfielduseastnfssa.blob.core.windows.net:/maxfielduseastnfssa/maxcontainer /mnt/blobnfs -o vers=3,sec=sys
Note that I was using a storage account named maxfielduseastnfssa and a container called maxcontainer. Finally, I created a small test file on the NFS share, to later on be able to verify that everything is working from the Autonomous Database.
Ensuring network connectivity from the Autonomous DB to the NFS share
Before actually mounting the NFS share on the Autonomous Database, let’s make sure the networking prerequisites have been met.
Check your firewalls
To allow communication, you must configure your firewalls:
- OCI Network Security Group (NSG): Per default, OCI NSGs should allow egress on all ports. If this is not yet configured, open the Autonomous database OCI NSG to allow egress traffic from the ADB-S instance to the Azure Storage Account private endpoint (in my case
10.0.0.7). The NFS 3.0 protocol uses ports 111 and 2048, I recommend to use a stateful rule. Make sure that your NSGs allows outgoing communication through those ports. Note that OCI Network Security Groups must be specifically openend for communication to work. - Azure Network Security Group (NSG): You might need to allow communication in multiple places.
- Ensure the Azure NSG that controls traffic to the subnet where storage account’s private endpoint is allows inbound traffic from the ADB-S private IP address on the ports mentioned above.
- Also, if you have Advanced Networking enabled, you would be able to add an Azure NSG to the Oracle Delegated subnet. Ensure this NSG allows traffic as well, similar to the OCI NSG.
Check your DNS Configuration in the OCI Virtual Cloud Network
There are multiple ways to configure DNS with Oracle DB@Azure. Depending on whether you have private DNS forwarding enabled between OCI and Azure the following steps might differ. Importantly, you need to make sure the Autonomous Database instance is able to resolve the URL to the private endpoint of the Azure Storage Account.
If you have not yet configured DNS forwarding, you need to manually manage the DNS records on the OCI console:
- Go to the Azure Portal, under Oracle Database@Azure, Autonomous Databases, select your Autonomous Database instance and use the “Go to OCI” button.
- On the Autonomous Database defailts page on the OCI portal, head down to the networking section and select your Virtual Cloud Network.
- On the Virtual Cloud Network details page in the OCI console, select your DNS resolver.
- Open the Default Private View.
- Under Private Zones, you can select Create zone, to add a new DNS zone to your existing Private View.
- Select zone type Primary, and enter your zone name (in my case it’s
blob.core.windows.net) and hit Create. - Select your newly created DNS zone, and Manage records. You will be able to select Add record:
- Enter the name of your DNS record, in my case it’s
maxfielduseastnfssa. - Select A - IPv4 address record.
- Select a low TTL, like 60 (which could potentially simplify if you make a mistake).
- Enter the name of your DNS record, in my case it’s
- Select Save Changes, then Review changes and finally Publish records.
- Select zone type Primary, and enter your zone name (in my case it’s
If your OCI Virtual Cloud Network is deployed in your home region you may use OCI Cloud Shell with an ephemeral IP address on your VCN to test the DNS resolution using nslookup which in my case returns 10.0.0.7.
Note: Do not try to use OCI Cloud Shell to test the connectivity towards Azure private IP addresses like the Storage Account private endpoint, this connectivity is blocked.
Mounting Azure Blob Storage on Autonomous Database
We are finally ready to mount the Azure Blob Storage container on the Autonomous Database using NFSv3. Connect to your Autonomous Database instance and set outbound connections to use the Autonomous Database private endpoint:
ALTER DATABASE PROPERTY SET ROUTE_OUTBOUND_CONNECTIONS = 'ENFORCE_PRIVATE_ENDPOINT';
You can find out more about this configuration on the Autonomous Database documentation.
Next, we need to open the Access Control Lists of the Autonomous Database instance, to allow outgoing traffic towards the Storage Account private endpoint (replace the URL with your endpoint):
exec DBMS_NETWORK_ACL_ADMIN.APPEND_HOST_ACE(host =>'maxfielduseastnfssa.blob.core.windows.net', ace => xs$ace_type(privilege_list => xs$name_list('connect', 'resolve'), principal_name => 'ADMIN', principal_type => xs_acl.ptype_db));
Now, create the directory:
CREATE OR REPLACE DIRECTORY BLOBNFS_DIR AS 'BLOBNFS';
Finally, attach the file system using DBMS_CLOUD_ADMIN:
exec DBMS_CLOUD_ADMIN.ATTACH_FILE_SYSTEM(file_system_name => 'MAXFIELDUSEASTNFSSA', file_system_location => 'maxfielduseastnfssa.blob.core.windows.net:/maxfielduseastnfssa/maxcontainer', directory_name => 'BLOBNFS_DIR', description => 'Azure blob as nfs', params => JSON_OBJECT('nfs_version' value 3));
You should see PL/SQL procedure successfully completed. You can test the attachment by listing the contents:
SELECT * FROM TABLE(DBMS_CLOUD.LIST_FILES('BLOBNFS_DIR'));
Conclusion
By following these steps, you’ve successfully mounted an Azure Blob container as an NFSv3 file system directly onto your Oracle Autonomous Database. You are now ready to begin your data migration, with a secure and robust pathway for moving your data into Oracle Database@Azure. Let me know if you have any feedback, cheers.