
Oracle REST Data Services (ORDS) provides a RESTful API to talk to an Oracle Database. Additionally, it provides access to the PDB Lifecycle Management API, which allows users to manage database lifecycle operations via REST.
This is extremely useful in order to orchestrate Oracle database with DevOps or CI/CD tools as well as to use Oracle database in combination with Kubernetes/Openshift. This article covers how to configure PDB Lifecycle Management APIs for Oracle database.
Overview
ORDS is a Java web application that can be run in standalone-mode or using Tomcat. The application connects to the Oracle database of interest and exposes a set of RESTful APIs. The application can run on the database instance or on a separate server (recommended). It mainly offers the following APIs / features:
- RESTful Web Services: Access database tables and views via REST
- SQL Web Developer: A web application that offers IDE-like features for SQL and to manage a RESTful development environment
- Database Management API: Lots of endpoints to manage your Oracle DB, including the PDB Lifecycle Management
The full set of APIs exposed by PDB Lifecycle Management can be found here.
Installation instructions
For this tutorial I used a clean Oracle 19c database VM running on Oracle Database Cloud Service. However, these steps should work for any Oracle database (that uses the CDB/multitenant architecture).
Prepare database
- Connect to the database and make a note of the database SID or the database service name of the CDB.
- Find the SID using
select instance from v$thread; - Alternatively connect to the CDB and use
Show parameter service_name;to get the database service name
- Find the SID using
- The PDB lifecycle management needs a user in the root container with
sysdbapriviledges so let’s create one.
CREATE USER C##DBAPI_CDB_ADMIN IDENTIFIED BY <PASSWORD>;
GRANT SYSDBA TO C##DBAPI_CDB_ADMIN CONTAINER = ALL;
That’s it, we are ready for the ORDS installation.
Install ORDS webserver on a VM
A newly created virtual machine with a clean installation of CentOS / Oracle Linux is used in this tutorial.
Download the latest Oracle REST Data Services release, copy it to your desired location and unzip the files to a new directory.
scp ords-20.4.3.050.1904.zip opc@158.101.164.123:/home/opc/
ssh opc@158.101.164.123
unzip -d ords ords-20.4.3.050.1904.zip
cd ords
Since ORDS is packaged as a .war file, let’s make sure Java is installed with java -version and install Java if necessary using sudo yum install java-1.8.0-openjdk.
Now, we can start the ORDS installation flow . The following parameters need to be entered:
- A location to store configuration data: If the folder does not exist it will be created automatically.
- The name of the database server: Enter the address of the server (localhost or remote network address)
- Database listen port
- The database SID or database service name, which we made a note of earlier
- A database password for ORDS_PUBLIC_USER: This user will be created by ORDS to connect to the database for all ORDS calls. ORDS will also save the password (encrpyted) within its configuration files so no need to remember it.
- Enter administrator username:
sysin my case - Enter administrator password
- Next you will be asked if you are using
Oracle Application Express or migrating from mod_plsql then you must enter 1 [1]. If you are not, then enter2. -
Enter a number to select features to enable: Choose [1] or [4] * ** If you do not, you need to manually set
database.api.enabled=trueandrestEnabledSql.active=trueindefaults.xmlin order for the PDB lifecycle management API to workDo not yet start the webserver in standalone mode (enter
2). See the logs below for the full installation flow.
[opc@ords-instance-956270 ords]$ java -jar ords.war install
This Oracle REST Data Services instance has not yet been configured.
Please complete the following prompts


Enter the location to store configuration data: /home/opc/ords/config/
Enter the name of the database server [localhost]:db.pubsubnet.amatest.oraclevcn.com
Enter the database listen port [1521]:1521
Enter 1 to specify the database service name, or 2 to specify the database SID [1]:1
Enter the database service name:DB0511_fra1rd.pubsubnet.amatest.oraclevcn.com
Enter the database password for ORDS_PUBLIC_USER:
Confirm password:
Requires to login with administrator privileges to verify Oracle REST Data Services schema.

Enter the administrator username:sys
Enter the database password for SYS AS SYSDBA:
Confirm password:
Connecting to database user: SYS AS SYSDBA url: jdbc:oracle:thin:@//db.pubsubnet.amatest.oraclevcn.com:1521/DB0511_fra1rd.pubsubnet.amatest.oraclevcn.com

Retrieving information...
Your database connection is to a CDB.  ORDS common user ORDS_PUBLIC_USER will be created in the CDB.  ORDS schema will be installed in the PDBs.
Root CDB$ROOT - create ORDS common user
PDB PDB$SEED - install ORDS 20.4.3.r0501904 (mode is READ ONLY, open for READ/WRITE)
PDB PDB1 - install ORDS 20.4.3.r0501904

Enter 1 if you want to use PL/SQL Gateway or 2 to skip this step.
If using Oracle Application Express or migrating from mod_plsql then you must enter 1 [1]:2
Enter a number to select a feature to enable:
   [1] SQL Developer Web  (Enables all features)
   [2] REST Enabled SQL
   [3] Database API
   [4] REST Enabled SQL and Database API
   [5] None
Choose [1]:1
2021-05-11T14:10:48.648Z INFO        reloaded pools: []


Installing Oracle REST Data Services version 20.4.3.r0501904 in CDB$ROOT
... Log file written to /home/opc/ords_cdb_install_core_CDB_ROOT_2021-05-11_141049_00053.log
... Verified database prerequisites
... Created Oracle REST Data Services proxy user
Completed installation for Oracle REST Data Services version 20.4.3.r0501904. Elapsed time: 00:00:02.427

Installing Oracle REST Data Services version 20.4.3.r0501904 in PDB$SEED
... Log file written to /home/opc/ords_cdb_install_core_PDB_SEED_2021-05-11_141053_00382.log
... Verified database prerequisites
... Created Oracle REST Data Services proxy user
... Created Oracle REST Data Services schema
... Granted privileges to Oracle REST Data Services
... Created Oracle REST Data Services database objects
... Log file written to /home/opc/ords_cdb_install_datamodel_PDB_SEED_2021-05-11_141107_00978.log
... Log file written to /home/opc/ords_cdb_install_apex_PDB_SEED_2021-05-11_141109_00300.log
Completed installation for Oracle REST Data Services version 20.4.3.r0501904. Elapsed time: 00:00:16.923

Installing Oracle REST Data Services version 20.4.3.r0501904 in PDB1
... Log file written to /home/opc/ords_cdb_install_core_PDB1_2021-05-11_141110_00925.log
... Verified database prerequisites
... Created Oracle REST Data Services proxy user
... Created Oracle REST Data Services schema
... Granted privileges to Oracle REST Data Services
... Created Oracle REST Data Services database objects
... Log file written to /home/opc/ords_cdb_install_datamodel_PDB1_2021-05-11_141121_00441.log
... Log file written to /home/opc/ords_cdb_install_apex_PDB1_2021-05-11_141122_00382.log
Completed installation for Oracle REST Data Services version 20.4.3.r0501904. Elapsed time: 00:00:12.397

Completed CDB installation for Oracle REST Data Services version 20.4.3.r0501904.
Total elapsed time: 00:00:34.297

Enter 1 if you wish to start in standalone mode or 2 to exit [1]:2
ORDS is now installed, however in order to use the PDB lifecycle APIs we need to provide ORDS with the credentials of the database user C##DBAPI_CDB_ADMIN that we initially created. Run the following:
echo db.cdb.adminUser=C##DBAPI_CDB_ADMIN as SYSDBA > cdbAdmin.properties
echo db.cdb.adminUser.password=<PASSWORD> >> cdbAdmin.properties
java -jar ords.war set-properties --conf apex_pu cdbAdmin.properties
rm cdbAdmin.properties
These credentials can now be found within your config folder, e.g. cat config/ords/conf/apex_pu.xml.
Finally, we need to set up some web server credentials with the SQL Administrator role to protect the API. In this case we are using ORDS in standalone mode, so we can create these credentials with this command, which will prompt for a password (this password will be used to authorize the REST calls):
java -jar ords.war user sql_admin "SQL Administrator"
Done! Now, we can run ORDS in standalone mode. For simplicity I am not using HTTPS in this tutorial. Also make sure to open the desired firewall port (in my case 8080) before proceeding.
sudo firewall-cmd --permanent --add-port=8080/tcp
sudo firewall-cmd --reload

java -jar ords.war standalone
Enter 1 if using HTTP or 2 if using HTTPS [1]:1
Enter the HTTP port [8080]:
2021-05-11T14:18:42.609Z INFO        HTTP and HTTP/2 cleartext listening on host: localhost port: 8080
...
...
Accessing PDB Lifecycle Management API
You can interact with the PDB Lifecycle Management API with cURL, Postman or other tools.
Using Postman to access the API
The easiest way to interact with the PDB Lifecycle Management API is to use Postman.
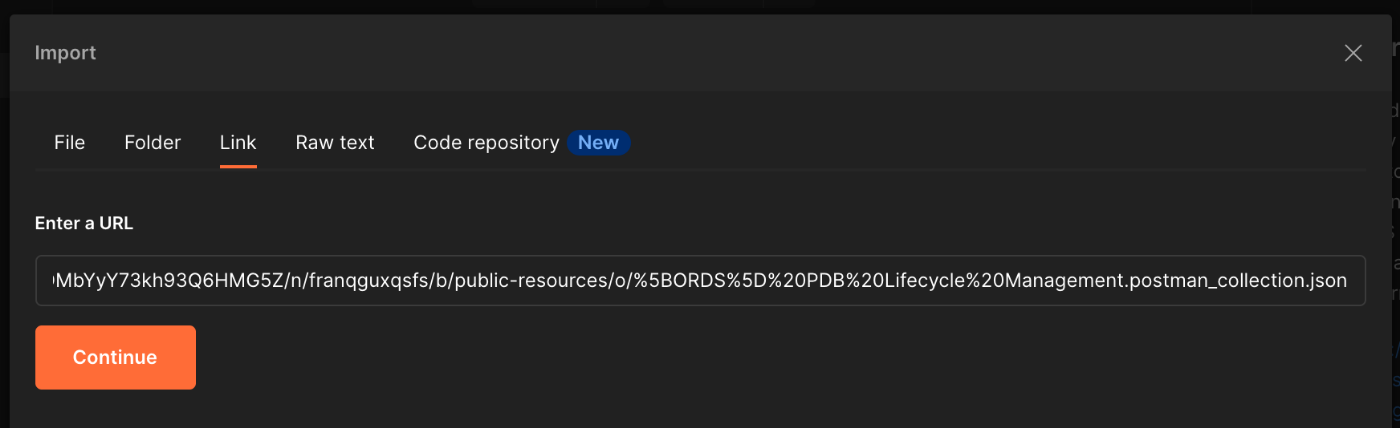
Import my PDB Lifecycle Management API Postman collection by opening Postman and choosing File -> Import -> Link and entering the following link:
https://objectstorage.eu-frankfurt-1.oraclecloud.com/p/rpg4hcyeb3cXT_-iDi6ySImjweJmu8ri3Nuz8pJhxJUKrDMbYyY73kh93Q6HMG5Z/n/franqguxqsfs/b/public-resources/o/%5BORDS%5D%20PDB%20Lifecycle%20Management.postman_collection.json
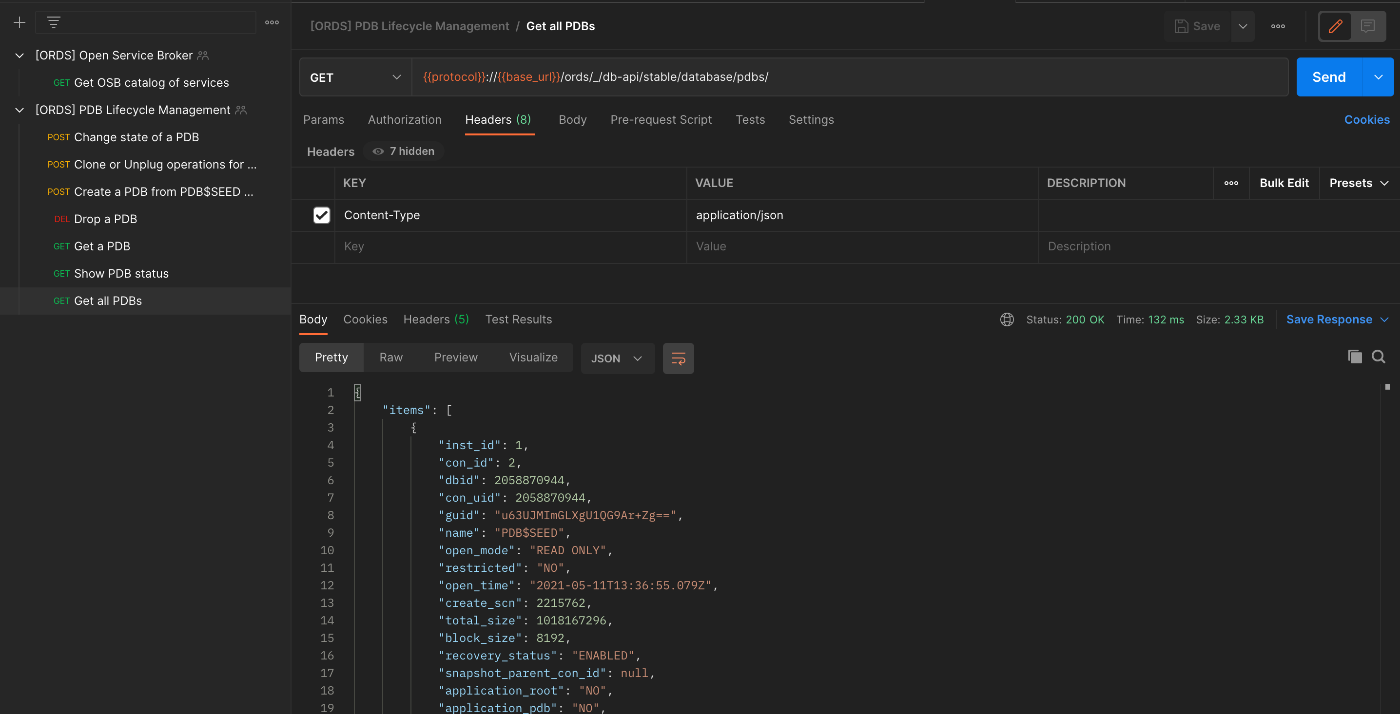
Select the collection (top level), choose Authorization and under Basic Auth enter a user name and password. This must correspond to the web server credentials that we entered earlier (username: sql_admin, password: yourpassword).

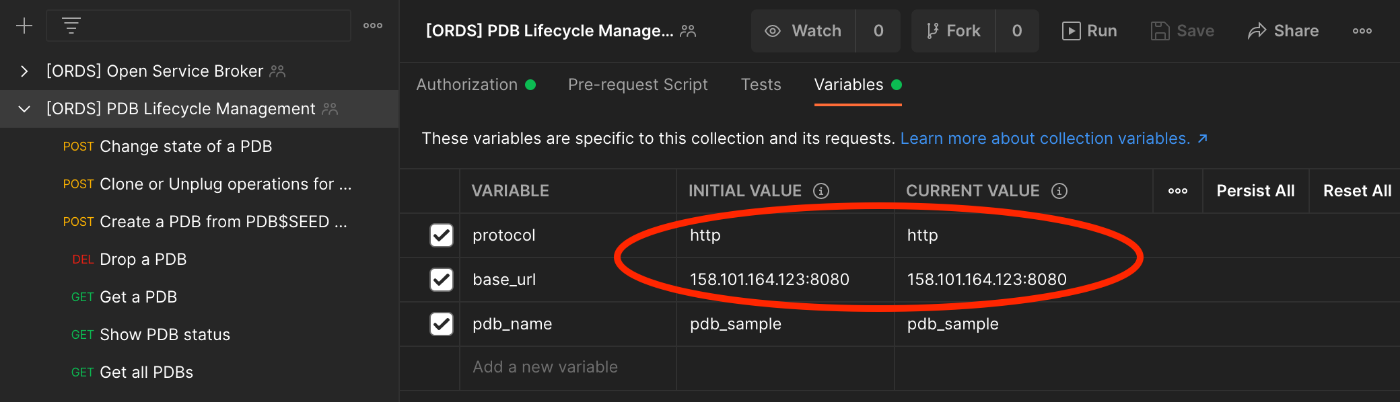
Then select the variables tab and enter the protocol http and base_url (including the port) of your web server.
Finally, select Get all PDBs and hit Send.
Using cURL to access the API
Use the web server credentials that we entered earlier to make requests against the API:
curl -X GET \
--user sql_admin:yourpassword \
'http://158.101.164.123:8080/ords/_/db-api/stable/database/pdbs/' \
--header 'Content-Type: application/json'