
When I launched this blog, I aimed at hosting it using free services only. Pretty cheap right? ;)
When using any kind of free tier offerings usually performance is not great. So, is it possible to host a blog completely for free and still achieve the perfect Lighthouse score?
What’s Lighthouse and why is it important?
Lighthouse is an open-source, automated tool made by Google for measuring the quality of web pages. It is important, since search engines like Google rank search results not only on relevance, but also on metrics such as page load speed and accessibility.

Lighthouse features audits for performance, accessibility, progressive web apps, SEO and more. Lighthouse is available through the Chrome browser or alternatively you can try it out on any website using web.dev. The Lighthouse score is comprised of four categories:
- Performance
- Accessibility
- Best Practices
- SEO
While the last three categories are quite easy to achieve, the first one (performance) was quite challenging using the free tier offerings only.
Architectural overview
This blog is hosted completely for free on Oracle Cloud free tier. See an overview of the architecture below, I will provide more details throughout this article.
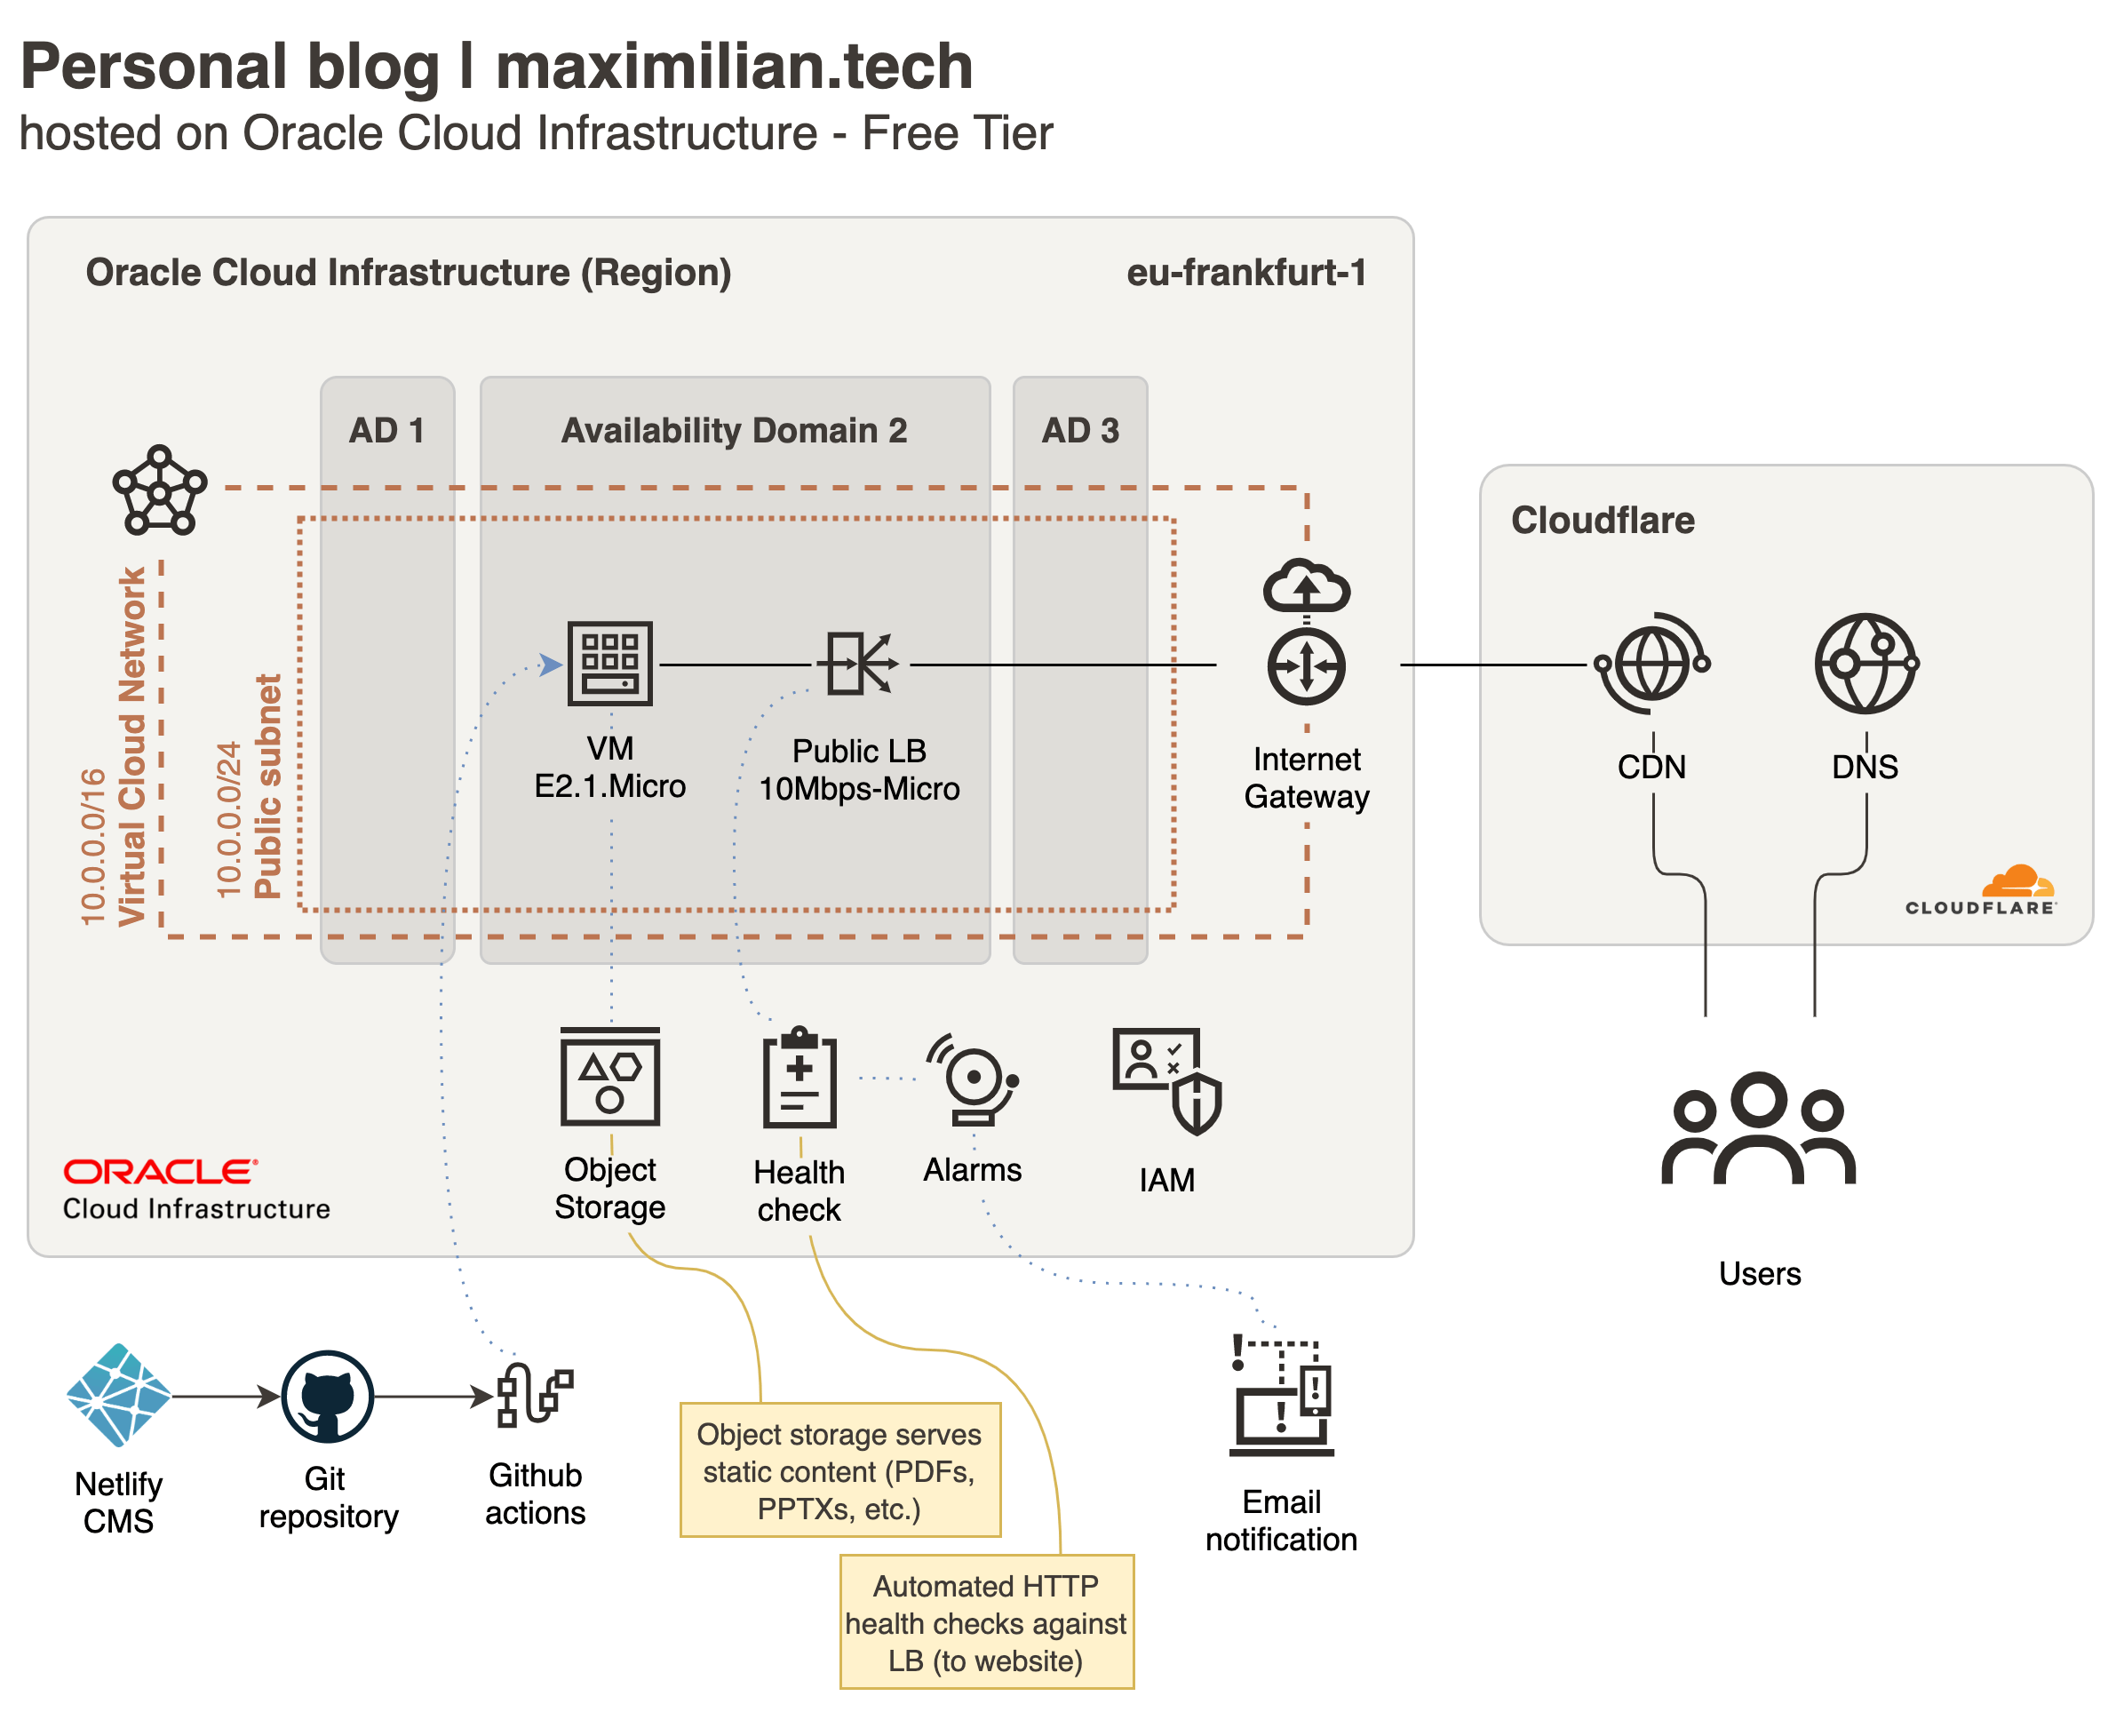
Oracle Cloud offers small virtual machines VM E2.1.Micro for free, where the site runs on an Apache web server.
The main performance bottleneck in this architecture is this virtual machine VM E2.1.Micro. This shape is an oversubscribed 1/8th AMD core, which frankly is not very fast. It can only handle the most basic of applications and is not suited for most workloads.
So in order to get a perfect Lighthouse score the blog itself needed to be optimized as much as possible.
Using static HTML
The most efficient way I could imagine to run this blog is to use static HTML only, in combination with a lightweight web server. At the same time, I wanted the blog to be easily manageable and to have a nice CMS (Content Management System) for creating blog articles.
This is where Jekyll comes into play. Jekyll is a static site generator that is perfectly suited for creating a blog. A static site generator (SSG) is a software application that creates HTML pages from text templates. I chose Jekyll over other SSGs, because:
- It uses Markdown as source templating language (and I use markdown anyways for my personal notes). This way I can write my articles using Joplin and publish them easily.
- It’s easy to use and has a huge ecosystem, including tools for SEO optimization.
- Can be customized in almost any way (e.g. using CSS for styling or adding some minimal JavaScript, which powers the light/dark mode on this page).
What is also useful is that I can use Github actions to run my Jekyll build pipelines for free. This means that every time I commit my Markdown files to my Git repository, the static HTML files get generated automatically.
Adding a CMS and versioning
As I mentioned, even though the site is based on Markdown and static HTML only, I prefer to use a CMS for content management (editing, adding pictures, etc). Since my code was already hosted in a private repository on Github I found the perfect solution: Netflify CMS.
Netlify CMS is an open-source content management system. It can be integrated into the site by simply adding a single HTML file:
<!doctype html>
<html>
<head>
  <meta charset="utf-8" />
  <meta name="viewport" content="width=device-width, initial-scale=1.0" />
  <title>Content Manager</title>
</head>
<body>
  <!-- Magic happens here! -->
  <script src="https://unpkg.com/netlify-cms@^2.0.0/dist/netlify-cms.js"></script>
</body>
</html>
The CMS accesses my personal Github account where all code is hosted. This way I get a full CMS as well as article versioning (through Git) for free and without any performance impact to my site 😎.
Hosting large files such as GIFs and videos
In order to host larger files (such as the video above) I use Oracle Cloud Object Storage. This is basically the equivalent to AWS S3 (it is even S3 compatible). Objects in the object storage can be easily published via a link and videos can be consumed seamlessly. Oracle Cloud Free Tier offers 10GB of free object storage.
Hiding behind a CDN for scalability
While the site seemed to perform well and my Lighthouse performance score reached almost 100, my site would basically crash if >10 Users would access the site. The reason for this is of course the underpowered free virtual machine in Oracle Cloud.
This is where Cloudflare came to the rescue. I put the complete domain behind Cloudflare CDN (and switched to Cloudflare DNS in the process). Cloudflare’s caching mechanisms are enough to make the site performant enough for concurrent user access.
Bringing it all together
I use Markdown to compose blog articles using Joplin. These blog articles are then published using Netflify CMS, which is hosted for free using unpkg.com. Once an article is published, Netlify CMS (which is authorized through my Github account) pushes the changes to my Github repository. There are Github Action pipelines in place, which are triggered on every commit and build the site using Jekyll. Jekyll transforms my Markdown files to static HTML and copies all files into a dist folder. Another pipeline then copies the dist folder to my virtual machine using scp.
You can find the full Lighthouse report on my blog here. If you have suggestions to improve this architecture feel free leave some feedback below.